I made this DIY bow holder for a neighbor of mine who just had her second baby, and first daughter. She already had lots of clothes/toys/books, so I decided to make her something she could use in the years to come. My sister made one of these for my daughter several years ago, and it still hangs in her bathroom and we still love it. Every little girl needs one of these. Here’s how to make a DIY bow holder.
This DIY project is super simple and very inexpensive.
Supplies Needed for Bow Holder:
- Small photo frame
- Ribbon of choice
- Scrap of fabric of choice
- Small wooden letter (I pained this one hot pink)
- Hot glue
- Bows!
I found all of my supplies at Hobby Lobby, including the frame which was 50% off. This frame was already painted and already had the hangers on the back, so it make it easy!

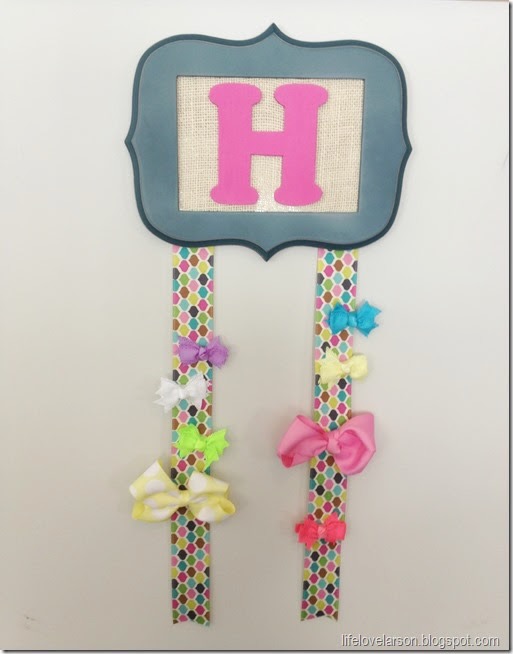
Cover the Glass with Fabric:
You will first need to take off the back of the frame and wrap your scrap fabric around the glass. I did not even glue the back of mine as the burlap was thick enough that it was tight when I put it back in. Next, insert the back and trim up your fabric.

Add Monogram to Frame:
Now you are ready to adhere your wooden letter to the front of the fabric. I hot glued the letter and eyeballed the center.

Attach the Ribbon:
Lastly, you will need to hot glue two pieces of ribbon (equal length) to the back of the frame. These can be as long or as short as you like!


Add your bows and you are done! Once you have your supplies, this can go very quickly. I love a handmade and personalized gift, don’t you?!

Cost breakdown: “H” ($1), Frame ($7), Burlap (already had), Ribbon ($2), Craft paint (already had). I also purchased a few bows to get her started, which can also be a part of the gift! The possibilities are endless when it comes to color combinations you could choose. In case you missed it, click here to find out how we store our headbands! xo
Very cute!! Will the hot glue be strong enough to hold alot of bows? Thanks for the great idea!!
Yes!! My daughter has one that holds at least 15 differnt bows, clips, etc!
This is super cute!
What a fantastic idea…this would come in so handy around my house! This would be great to link-up to my Create It Thursday post…it's live now!
Saw this on "Somewhat Simple" link party. I love this idea and will be trying it for ourselves and maybe some gifts! Saw the post on the headband holder. We use the oatmeal container too, but used scrapbook paper instead. I think the fabric looks much nicer. Thanks for sharing!