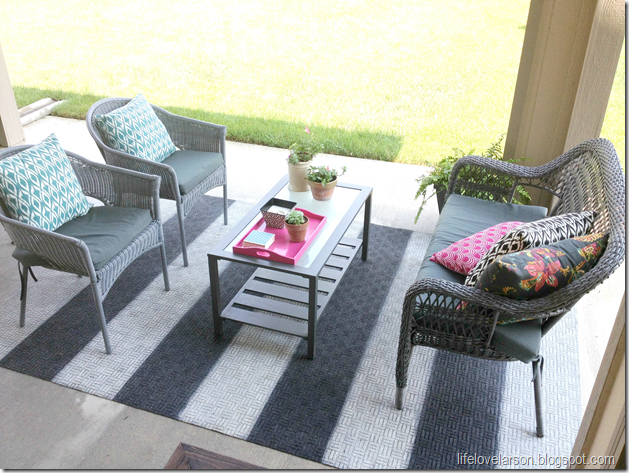
When I posted about our back patio progress, I mentioned that the striped rug underneath the seating area was a DIY project. Here are the details!

I purchased an inexpensive outdoor rug at Costco for $20. I figure if this project went haywire, I wasn’t out that much. This is one of those thin, mildew resistant, made from recycled bottles type of rug. I am pretty sure all home improvement stores sell them as well.
I knew I wanted to do something bold, so I stuck to what I love, classic stripes. I laid out the rug, got out my Frog Tape, and started measuring.
This is a 6 ft x 9 ft rug, so I figured I would create 9, 1 foot stripes. Pretty simple, right? Well, I started measuring and taping, but forgot to take into account the width of the tape, so I ripped it up and started over again. I finally got it right, but this part was time consuming (making sure each stripes was perfectly even end to end).
I used a tape measure every couple of inches to make sure the tape was lining up from end to end. You can see here that the stripes without the “x” are 12 inches apart.
You can see the stripes with the “x” are also 12 inches, but from the inside of the tape to the outside. These are the stripes that would not be painted. Does this make sense? You have to take into account the tape width and where it is placed!
Once I had all the stripes marked off, I used some left over primer to mark hard lines. I placed a piece of wood on the edge of the tape and roughly hand painted along the tape. I knew it would have been too hard to try to spray against tape that wasn’t adhering that great. This gave me the hard edge I needed to go ahead and spray paint inside (apologies for bad. dark garage pictures).
Once I had all the hard lines brush painted, I ripped up the tape. I then used cheap cans ($1) of spray paint to prime the surface really well. You will be surprised how much spray paint you will need, especially if using white on a dark rug, so start with the cheap stuff (it is still good for outdoor use). If I had to do it over again, I would have only sprayed 4 stripes, and kept 5 of them dark. I wasn’t thinking and added an extra stripe to my workload.
I then used some better spray paint to do a final top coat on each stripe. You will need a large sheet or piece of cardboard to place over the rest of the rug while you are spraying each stripe.
Unless you want to spend the rest of your life spraying, your white stripes will never perfectly cover the dark grey, but in the end I got the look I was going for.
I am absolutely happy with this rug, and I love accomplishing new-to-me DIY projects! I think it gives the space so much more personality than if there was no rug, or even a solid color rug.
I also love that this is a custom rug that no one else has! It is the number one thing people ask me about when they come to our back patio space and people are surprised it is DIY!
Here are some questions that I think might get asked, so here goes…
1. How do you clean it? I haven’t had to spray anything on this rug yet. Please keep in mind that this rug is under a covered patio, but it does get wet when it rains and mulch, grass, plant debris comes onto it when the wind blows. I have heard that Tilex Mold and Mildew bathroom cleaner is good for touching up outdoor rugs, but have never tried it. We have used a leaf blower and a broom on this rug, and outdoor debris comes off easily.
2. What is the texture like after spraying it? It is definitely harder than the non-painted surface, but not hard enough that you cannot walk on it without shoes. The texture has been a non-issue for us.
3. What was the total cost? I probably used $20 worth of spray paint, and the rug was $20.
4. How is the rug holding up? I sprayed this rug in April and put it on the patio in early May. It is holding up great! With touch ups and cleaning done as needed, I think this rug will hopefully last another year. Because I have furniture pieces on this rug, it has stayed in place. It is thin and light, so it will blow up on the corners if it gets windy and there is nothing on top of it.
5. Was it worth it? I mentioned before that this rug was a bit time consuming. I taped and sprayed over several days in the garage, working here and there around the kid’s schedules. I would absolutely do this again. I enjoy a challenge and trying new things. I am happy with the final result and in the end, it really didn’t cost that much, which is what I was going for!
More stripes…you know I love them!
Linking up with: http://betweennapsontheporch.net/, http://somedaycrafts.blogspot.com/, http://frenchcountrycottage.blogspot.com/, http://savvysouthernstyle.net/, http://www.houseofhepworths.com/, http://www.notjustahousewife.net/, http://shabbynest.blogspot.com/, http://sixsistersstuff.blogspot.com/, http://lilluna.com/, http://whipperberry.com/, http://www.somewhatsimple.com/, http://craftionary.blogspot.com/, http://itsoverflowing.com, http://www.keepingitsimplecrafts.com/, http://www.skiptomylou.org/, http://www.homestoriesatoz.com/, http://lollyjane.com/