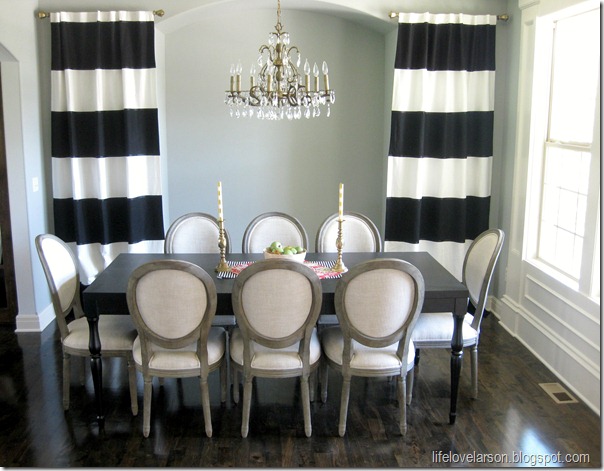
Cue several online images for thick black/white striped curtains, and knew I wanted to try and DIY my own version. I love black and white, and I will never get sick of a classic stripe. I figured this look would be classic, but it would still pack a punch in the space. I was drawn to this DIY post because it was “no-sew”. So, let’s get started. To complete the striped panels, I used pre-existing white curtain panels, 3 yards of black twill fabric, a no-sew bonding agent, an iron, and black grosgrain ribbon.
I find this to be the easiest fusible tape because it is sticky on both sides and stays in place really well on the fabric (don’t forget to use your 40% coupon when purchasing this!).
Black twill fabric is inexpensive too. I also used a coupon for this.
First, you must determine how thick you want your stripes to be. My curtains were 98”, so I decided on 7 stripes that would be 14” wide. Each panel has 4 black stripes, and 3 white. Start measuring and cut all of your black pieces. You want your stripes to be straight, but the ends might be a little frayed. This is okay, as the raw edge will eventually be covered up with ribbon.
Once you have your black pieces cut, start lining up the pieces on the curtain and securing with pins 14” apart. Start at the top and work your way to the bottom. I think my black piece on the bottom ended up being shorter than the rest but they drape the ground so you can’t even tell. As you can see, I did this in the middle of my kitchen eating area. It was the only space large enough to lay everything out!
You will then use your iron to fuse the black panels onto the curtains. During this process, I put a towel under the curtain and then ironed. The curtains are too large to maneuver on an ironing board. Wrap the edges around the back and secure with the fusible webbing. You are working with stripes, so you need to make sure everything lines up. Of course, my panels are not perfect, but I did spend the time to make sure they “appear” as straight as possible.
After my first panel was completed, I lined up the two before working on the second one. Not only does each individual panel need to be even, but they work together on the wall, so you want both curtains to be even.
Once the black pieces are adhered, you will want to cover the raw edges with black grosgrain ribbon. This part is goes quickly because you are just placing it on the seams.
Give the curtains a good ironing and you are ready to put them up! This process did take me awhile. The no-sew takes longer, and I was trying to be really meticulous about keeping everything even and straight. I made these over several days, chipping away a little at a time.
The breakdown:
White IKEA Curtains (previously purchased): $29.99
Black Twill Fabric: $15.00
Grosgrain Ribbon: $4.50
Fusible Web (used 2 of these): $6.00
I ended up with two custom curtain panels for under $60. These took me a while, but they are one of my most favorite DIY projects I have ever done. They are one of the first things you see when you walk in the house and they.are.dramatic.
I chose gold/brass curtain rods for this space. I purchased two Martha Stewart rods at Home Depot for about $20 each.
How’s that for the longest post in history?! The dining room has changed some from these pictures, so I will update under the “home tour” tab when it gets a little further along.
If you want to see the entire dining room progress, you can find that post here. We have since added a vintage bar cart to the space and are currently working on a little eclectic gallery wall in the niche. Stay tuned!